こんにちは、コンスキです。
今回は、ページネーションをタップすることで、スライダーをスライドできるようにしていきます。
完成形
スライダー上を指でスライドすることで、スライダーの表示を切り替えられるにするのが理想ですが、今回はページネーションの丸をタップすることでスライダーの表示を切り替えられるようにします。
完成形はこれです↓
まずはコードを示しておきます。
//	画面幅の範囲を設定
let windowWidth = window.innerWidth;
let tabletBreakPoint = 999;

// vwをpxに変換する関数
function vw(v) {
  var w = Math.max(document.documentElement.clientWidth, window.innerWidth || 0);
  return (v * w) / 100;
}

// 表示されている要素のインデックス
let activeElementIndex = 0;

//画面幅によって分岐
if(windowWidth > tabletBreakPoint) {
	// 要素を取得する
	let imgSlider = document.getElementById('img_slider_item_container');
	let nextButton = document.getElementById('down_arrow');
	let prevButton = document.getElementById('up_arrow');
	let categoryArray = document.getElementsByClassName('blog_category');
	let liSlider = document.getElementById('blog_text_list');
	//表示しているブログのカテゴリーを強調する関数
	function fontSwitching() {
	  categoryArray[activeElementIndex].classList.add('emphasize');
	}

	// 表示されている画像以外の位置を「top: 70px;」にリセットする関数
	function imgPositionReset() {
	  Object.keys(imageArray).filter(function(element) {
			return element != activeElementIndex;
	  }).forEach(function(key)  {
    	imageArray[key].style.top = '70px';
	  })
	}


	// 1番目のスライダー画像の表示と1番目のカテゴリーの強調
	let imageArray = imgSlider.getElementsByTagName('img');
	imageArray[activeElementIndex].style.opacity = '1';
	imageArray[activeElementIndex].style.top = '0';
	categoryArray[activeElementIndex].classList.add('emphasize');

	// 1番目のブログタイトルとブログの内容の表示
	let textArray = liSlider.getElementsByTagName('li');
	textArray[activeElementIndex].style.opacity = '1';
	textArray[activeElementIndex].style.top = '0';


	// 次の要素に切り替える関数
	function nextElement(){
	  	imageArray[activeElementIndex].style.opacity = '0';
	  	textArray[activeElementIndex].style.opacity = '0';
		setTimeout(function() {
			imageArray[activeElementIndex].style.top = '-70px';
			textArray[activeElementIndex].style.top = '-70px';
			if(activeElementIndex >= imageArray.length - 1){
		  		activeElementIndex = 0;
			} else {
		  		activeElementIndex++;
			}
			setTimeout(function() {
		  		imageArray[activeElementIndex].style.top = '0';
		  		textArray[activeElementIndex].style.top = '0';
		  		setTimeout(function() {
					imageArray[activeElementIndex].style.opacity = '1';
					textArray[activeElementIndex].style.opacity = '1';
					imgPositionReset();
		  		}, 100)
			}, 500);
			fontSwitching();
		}, 100)
	}

	// 前の要素に切り替える関数
	function previousElement(){
		imageArray[activeElementIndex].style.opacity = '0';
	  	textArray[activeElementIndex].style.opacity = '0';
	  	setTimeout(function() {
			imageArray[activeElementIndex].style.top = '-70px';
			textArray[activeElementIndex].style.top = '-70px';
			if(activeElementIndex <= 0){
		  		activeElementIndex = imageArray.length - 1;
			} else {
		  		activeElementIndex--;
			}
			setTimeout(function() {
				imageArray[activeElementIndex].style.top = '0';
			  	textArray[activeElementIndex].style.top = '0';
			  	setTimeout(function() {
					imageArray[activeElementIndex].style.opacity = '1';
					textArray[activeElementIndex].style.opacity = '1';
					imgPositionReset();
			  	}, 100)
			}, 500);
			fontSwitching();
		  }, 100)
	}

	// 下矢印をクリックされたら次の要素に切り替える
	nextButton.addEventListener('click', function() {
	  nextElement();
	});
	// 上矢印をクリックされたら前の要素に切り替える
	prevButton.addEventListener('click', function() {
	  previousElement();
	});
} else {
	// 要素を取得する
	let imgSlider = document.getElementById('img_slider_item_container');
	let liSlider = document.getElementById('blog_text_list')
	let pagination = document.getElementById('blog_content_pagination');
	let paginationCircle = pagination.getElementsByTagName('+');

	// 全てのスライダー画像の位置を「left: 193.791vw;」に設定
	let imageArray = imgSlider.getElementsByTagName('img');
	Object.keys(imageArray).forEach(function(key)  {
		imageArray[key].style.left = vw(193.791) + 'px';
	});

	// 表示されている画像以外の位置を「left: 193.791vw;」にリセットする関数
	function imgPositionReset() {
	  Object.keys(imageArray).filter(function(element) {
			return element != activeElementIndex
	  }).forEach(function(key)  {
		  setTimeout(function() {
			 imageArray[key].style.left = vw(193.791) + 'px';
		  }, 150)
	  })
	}

		// 1番目のスライダー画像の表示
	imageArray[activeElementIndex].style.opacity = '1';
	imageArray[activeElementIndex].style.left = '0';

	// 1番目のブログタイトルとブログの内容の表示
	let textArray = liSlider.getElementsByTagName('li');
	textArray[activeElementIndex].style.opacity = '1';
	textArray[activeElementIndex].style.left = '0';

	// ページネーションの1番目(1番左)の丸を黒くする
	paginationCircle[activeElementIndex].getElementsByTagName('circle')[0].style.fill = '#000000';

	// 1番目のスライダー画像に切り替える
	function firstElement() {
		imageArray[activeElementIndex].style.opacity = '0';
		textArray[activeElementIndex].style.opacity = '0';
		paginationCircle[activeElementIndex].getElementsByTagName('circle')[0].style.fill = '#ffffff';
		setTimeout(function() {
			imageArray[activeElementIndex].style.left = '-' + vw(93.791) + 'px';
			activeElementIndex = 0;
			imageArray[activeElementIndex].style.opacity = '1';
			textArray[activeElementIndex].style.opacity = '1';
			paginationCircle[activeElementIndex].getElementsByTagName('circle')[0].style.fill = '#000000';
			setTimeout(function() {
				imageArray[activeElementIndex].style.left = '0' ;
				imgPositionReset();
			}, 100);
		}, 100);
	}

	// 2番目のスライダー画像に切り替える
	function secondElement() {
		imageArray[activeElementIndex].style.opacity = '0';
		textArray[activeElementIndex].style.opacity = '0';
		paginationCircle[activeElementIndex].getElementsByTagName('circle')[0].style.fill = '#ffffff';
		setTimeout(function() {
			imageArray[activeElementIndex].style.left = '-' + vw(93.791) + 'px';
			activeElementIndex = 1;
			imageArray[activeElementIndex].style.opacity = '1';
			textArray[activeElementIndex].style.opacity = '1';
			paginationCircle[activeElementIndex].getElementsByTagName('circle')[0].style.fill = '#000000';
			setTimeout(function() {
				imageArray[activeElementIndex].style.left = '0' ;
				imgPositionReset();
			}, 100);
		}, 100);
	}

	// 3番目のスライダー画像に切り替える
	function thirdElement() {
		imageArray[activeElementIndex].style.opacity = '0';
		textArray[activeElementIndex].style.opacity = '0';
		paginationCircle[activeElementIndex].getElementsByTagName('circle')[0].style.fill = '#ffffff';
		setTimeout(function() {
			imageArray[activeElementIndex].style.left = '-' + vw(93.791) + 'px';
			activeElementIndex = 2;
			imageArray[activeElementIndex].style.opacity = '1';
			textArray[activeElementIndex].style.opacity = '1';
			paginationCircle[activeElementIndex].getElementsByTagName('circle')[0].style.fill = '#000000';
			setTimeout(function() {
				imageArray[activeElementIndex].style.left = '0' ;
				imgPositionReset();
			}, 100);
		}, 100);
	}

	// ページネーション1番目(左)の丸をクリックされたら1番目の要素に切り替える
	paginationCircle[0].addEventListener('click', function() {
	  firstElement();
	});

	// ページネーション2番目(真ん中)の丸をクリックされたら2番目の要素に切り替える
	paginationCircle[1].addEventListener('click', function() {
	  secondElement();
	});

	// ページネーション3番目(真ん中)の丸をクリックされたら3番目の要素に切り替える
	paginationCircle[2].addEventListener('click', function() {
	  thirdElement();
	});
}
仕組みの説明
次にコードの中から大切だと思う部分の説明をします。
まずは5行目から9行目のコードに注目します。
// vwをpxに変換する関数
function vw(v) {
  var w = Math.max(document.documentElement.clientWidth, window.innerWidth || 0);
  return (v * w) / 100;
}
この部分はvwという単位をpxという単位に変換する関数です。
CSSの中ではvwを値の後に書けば、自動的に画面幅に対する大きさを指定できました。
しかし、JavaScriptではそれができません。
例えば、スライダーの画像を左に動かそうという時を考えてください。
pxで移動する位置を指定すると、タブレットの大きさによって多少移動する幅に誤差が生じてしまいます。
大きい画面のタブレットでは、かなり左に動きますが、小さい画面のタブレットではほんの少ししか左に動かないということもありえます。
そこで、「vw」の部分を除いた値をこの関数の引数として渡すことで、画面幅に応じたpx単位の値が返ってくる仕組みになっています。
次は、114行目から118行目のコードに注目します。
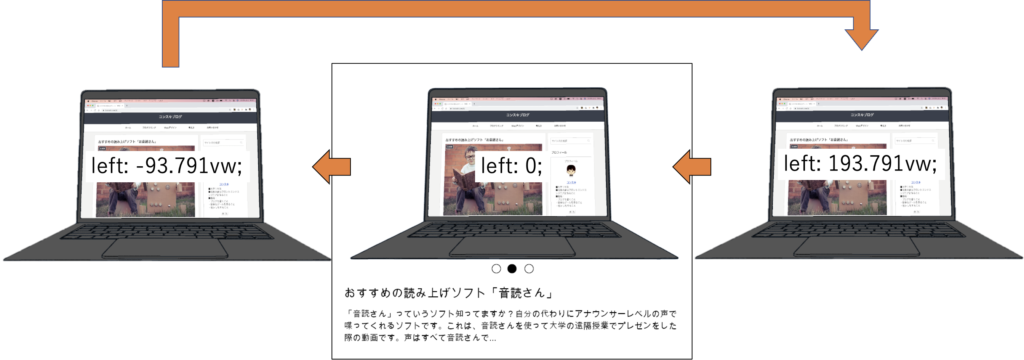
// 全てのスライダー画像の位置を「left: 193.791vw;」に設定
let imageArray = imgSlider.getElementsByTagName('img');
Object.keys(imageArray).forEach(function(key)  {
	imageArray[key].style.left = vw(193.791) + 'px';
});
ブログ画像とは、スライダーで動かす画像のことです。
ここで全てのブログ画像を「left: 193.791vw;」設定している理由は、ブログ画像を右から左に動かすためです。
「left: 193.791vw;」に設定しておくと、画面の右外にブログ画像が移動して、画面には表示されなくなります。
次は、143行目から159行目までです。
// 1番目のスライダー画像に切り替える
function firstElement() {
	imageArray[activeElementIndex].style.opacity = '0';
	textArray[activeElementIndex].style.opacity = '0';
	paginationCircle[activeElementIndex].getElementsByTagName('circle')[0].style.fill = '#ffffff';
	setTimeout(function() {
		imageArray[activeElementIndex].style.left = '-' + vw(93.791) + 'px';
		activeElementIndex = 0;
		imageArray[activeElementIndex].style.opacity = '1';
		textArray[activeElementIndex].style.opacity = '1';
		paginationCircle[activeElementIndex].getElementsByTagName('circle')[0].style.fill = '#000000';
		setTimeout(function() {
			imageArray[activeElementIndex].style.left = '0' ;
			imgPositionReset();
		}, 100);
	}, 100);
}
この部分ではスライダー画像の位置と透明度を変更しています。
スライダー画像が画面の右外に隠れて見えなくなっている状態から「右 → 真ん中 → 左 → 右」のようにしてブログ画像の位置を変更していきます。
それと同時にブログ画像の透明度を変化させることで、ブログ画像が切り替わっているように見せることができます。
この部分では「setTimeout」という関数をたくさん使用してしまっています。
setTimeoutはを何度も使うとなると、次のような「コールバック地獄」というみづらい入子状態のコードになってしまうため、本来は対策をする必要があるようです。
setTimeout(function() {
  setTimeout(function() {
    setTimeout(function() {
      setTimeout(function() {
        ...
      }, 100)
    }, 100)
  }, 100)
}, 100)
おわりに
今回は、タブレット用のスライダーに動きをつけるためのJavaScriptを書いてみました。
動きはしますが、このスライダーはまだまだ不自然な動作になっています。
スライダーの画像が右から左にしか動かないので画像の位置関係がわからなくなってしまっています。
これからは、そんな感じの部分を改善していけたらいいです。


コメント