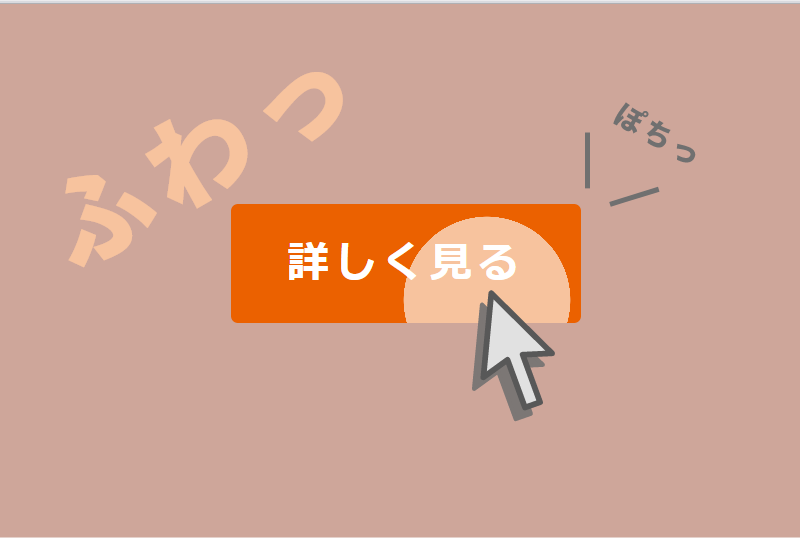
ボタンをクリックしたら、クリックしたところから波紋が広がるアニメーションがありますよね。
このボタンの作り方を説明します。
クリックした位置から波紋が出るボタンの作り方
次のコードを写すとすぐに使えます。
まずはHTMLから。ボタンの本体は16行目にあります。
<!DOCTYPE html>
<html lang="ja">

<head>
  <meta charset="UTF-8">
  <meta name="viewport" content="width=device-width, initial-scale=1">
  <title>クリックした所から波紋</title>
  <link rel="stylesheet" type="text/css" href="style.css">
  <!-- Webフォントを使うため ↓ -->
  <link href="https://fonts.googleapis.com/css2?family=Inter:wght@200;400;700&family=Noto+Sans+JP:wght@100;400;700&display=swap" rel="stylesheet">
  <!-- Webフォントを使うため ↑ -->
</head>

<body>
  <!-- 波紋が出るボタン ↓ -->
  <button class="ripple-button">詳しく見る</button>
  <!-- 波紋が出るボタン ↑ -->
  <script src="index.js"></script>
</body>

</html>
次はCSSです。色が濃くなっている行が重要です。
body {
  height: 100vh;
  margin: 0;
  display: grid;
  place-items: center;
  font-family: 'Noto Sans JP', sans-serif;
  background-color: #b1b1b1;
  background-color: #cea69a;
}

button.ripple-button {
  position: relative;
  overflow: hidden;
  transition: background 400ms;
  color: #fff;
  background-color: #eb6100;
  padding: 1rem 2rem;
  font-size: 1.5rem;
  font-weight: 700;
  letter-spacing: 0.2rem;
  outline: 0;
  border: 0;
  border-radius: 0.25rem;
  cursor: pointer;
}

span.ripple {
  position: absolute;
  border-radius: 50%;
  transform: scale(0);
  animation: ripple 600ms linear;
  background-color: rgba(255, 255, 255, 0.7);
}

@keyframes ripple {
  to {
    transform: scale(4);
    opacity: 0;
  }
}
最後にJavaScriptです。
const firstIndex = 0; //最初の要素を指定するためのインデックス

//波紋を発生させるメソッド
function createRipple(e) {
  const button = e.currentTarget;
  const circle = document.createElement('span');
  const diameter = Math.max(button.clientWidth, button.clientHeight);
  const radius = diameter / 2;
  //クリックした位置に波紋(丸)を作る
  circle.style.width = circle.style.height = diameter+'px';
  circle.style.left = e.clientX - button.offsetLeft - radius + 'px';
  circle.style.top = e.clientY - button.offsetTop - radius + 'px';
  circle.classList.add('ripple');
  //波紋がすでにあるかどうか調べる
  const ripple = button.getElementsByClassName('ripple')[firstIndex];
  if (ripple) {
    ripple.remove(); //あったら波紋を削除
  }
  //作った波紋を要素として追加する
  button.appendChild(circle);
}

//ripple-buttonというクラス名がついたボタンを取得
const buttons = document.getElementsByClassName('ripple-button');
//クリックされたら波紋を表示させるようにする
for (const button of buttons) {
  button.addEventListener('click', createRipple);
}
クリックしたところから波紋が出る仕組み
アニメーションをつくるだけなら仕組みを知らなくても大丈夫ですが、
仕組みを知ると、アレンジすることができるかもしれません。
処理の大まかな手順
次の手順を踏んで波紋を出しています。
大まかな流れ
- ボタンをクリックする ユーザー
- クリックされた位置を取得する JavaScript
- 波紋になる要素(円)を作る JavaScript
- 円をクリックした位置に設定する JavaScript
- 円を表示する JavaScript
- 円を徐々に大きくするのと同時に不透明度を0にする CSS
省略しているところもありますが、大体こんな感じの流れです。
重要なのは、
円を大きくしながら徐々に消すことで波紋っぽくしているところです。
ここからは、分かりづらい部分の詳細を説明します。
円をクリックした位置に設定する
button.addEventListener('click', createRipple);addEventListenerメソッドを使うことで、ボタンがクリックされたときにcreateRipple関数を実行させます。
この関数の中では、波紋となるspan要素(円)を作り、クリックされた位置に来るように設定します。
  circle.style.left = e.clientX - button.offsetLeft - radius + 'px';  //span要素の位置を設定している
  circle.style.top = e.clientY - button.offsetTop - radius + 'px';    //span要素の位置を設定している
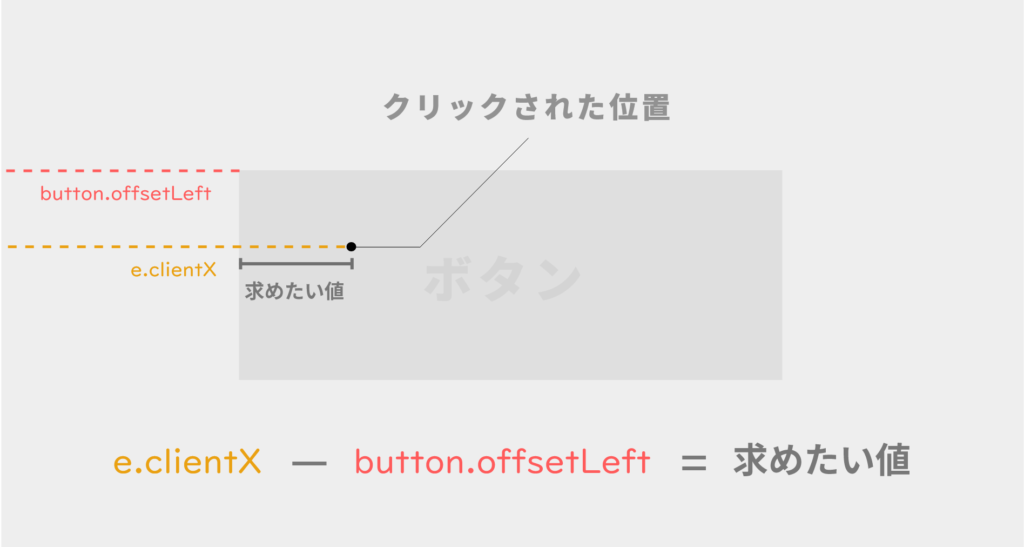
右辺を見てもらうと何回か引き算をやっています。
その引き算の結果をspan要素の位置として設定しています。
- circle.style.left
- circle.style.top
これらは、span要素の位置であるため、
まさにクリックした位置を設定している部分です。
引き算をやっていることで複雑に見えます。
しかし、この引き算はボタンの左上を基準にしたときの座標に変えているためにやっているだけです。

ボタンの左上を基準にするのは、span要素の位置を決めるtopとleftの値が、親要素*の左上を基準に決める必要があるためです。
親要素*
正確には、position: relative;であるspan要素の直近の親要素。


コメント